Thursday, March 8, 2012

Project Run and Play Audition: The Is it Spring Yet? Skirt

Hey Everyone!
Today, I am going to post pictures of the skirt I made as my audition for Project Run and Play! I am so excited that they are doing auditions this season! 
 I am calling this the Is it Spring Yet? skirt, because, I so wanted it to be warm enough for my sister to wear this with a different top, but it was 40 degrees out! So, she had to wear a coat :( It still turned out really cute though!

 I love this hair thing! I made it at the last minute when I was doing here hair, and needed something to bring it all together! It is twisted fabric wrapped up in a circle, with tulle and buttons hot glued to it! I love it!
 I love how the ruffles and buttons turned out on the front! I got the idea for the buttons and ruffles from a skirt a friend of mine had, that basically buttoned up the front. I added ruffles to make it a tad more girly!
I love her shoes with this outfit! She suggested them, and I was like, ummmm I don't really think that they will work, but she put them on, and they turned out so cute together! Great job Leah!
Tata,
Elizabeth

Friday, March 2, 2012

Flower Photo Shoot...


Hey Everyone!
Yesterday, I did a photo shoot with Leah featuring this felt flower that I made for her hair. We had tons of fun and I probably had a little TOO much fun going through her closet dressing her up :). So here are some pictures:

 I love that pink shirt! And... you can't see it in these pictures, but she even has PINK sweater tights on under her skirt!!!

 I love love love this one!
 And this one!
And this one! I loved putting filters on them even more! You can see her pink tights in that one, but they are grey :P...
Have a great day!(you will probably see more flower photo shoot posts in the very near future!)
eliZabeth

cute toddler dress: tutorial

Today, I made a little girls dress from a half yard of fabric and a t-shirt! It was super fun, and so I took pictures along the way:) I got the idea from this blog. The tutorial just used a t-shirt, but I wanted the dress a little longer than just a little girls t-shirt, so I used yardage to complete the dress. If you want more of a tunic top, then follow the blog linked above.

Materials
-Your choice of fabric(the amount will vary depending
on the size of the dress you are making and you can
make this for any size girl/ woman)

-A t-shirt (fitted is the best) in a size relatively close to
 the size you wear(or the person you are making this
for wears)

-Thread in a color coordinating with the shirt

Instructions


Step 1: Take the shirt and cut it around where would be an empire waist, for a little girl this is 1" to 2" below the armpits of the shirt.
Sorry I don't have a picture of the shirt before I cut it up, I was a bit eager to start this adorable dress! Save the bottom of the shirt! You will need it in about 10 seconds!
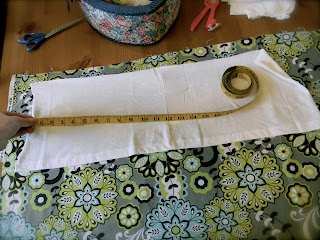


Step 2: Cut the bottom part of the shirt at one of the side seams, and measure the width of it.
Then, take the width and multiply it by two. For example, the width of this shirt is 24". Multiply 24 by 2 and you get 48.


Step 3: To determine the length of the skirt of your dress, measure from the bottom of the bodice, to where you would like your dress to fall. Add three inches for seam allowance.


Step 4: Using the length you found in step 3 and the width you
 found in step 2 as the dimensions, cut the skirt out of your
yardage.

Step 5: With right sides of your fabric together, sew it into a tube using a zigzag stitch.


Step 6: Hem one edge of your tube.


Step 7: Using long basting stitches, stitch a line, along the raw
edge of the tube. When you are done, do not backstitch, and
 leave a long thread hanging off of the end of the seam.

Step 8: Holding the long thread on the still raw, but stitched edge, pull the fabric down so that it starts scrunching up. Do this until the tube is only a little bits smaller than the bottom of the bodice.


Step 9: Pin, Pin, Pin!!! I did not take pictures of this, but I will try to explain what you need to do in great detail, since your success at doing this will make the dress beautiful! Do all of this right sides up(not inside out). As you are pinning the pieces together(the skirt on the inside and the bodice on the outside), you need to fold the edge of the bodice under a little bit, so that it looks like a finished edge. After you have accomplished this, stick the thin through the folded over edge, the skirt(right under the basting stitches) and back up through the shirt. Space the pins about an inch apart(yes, this is a lot of pins, but you will be in trouble otherwise :)).

Step 10: Using a very small straight stitch, stitch along the bottom of the bodice(about an eighth of an inch away from the fake finished edge you made). Make sure you catch all of the folds of the skirt AND bodice in this seam, or else, you will have to go back and stitch over them again.


Step 11: If you would like, you can add some embroidery, a fun tag, or some fun buttons to the bodice, or down the skirt. The shirt I used already had some fun flowers on it, so I just added my Studio E tag, and was done!


The Wonderful finished product:
The FrontThe Back
Enjoy!
I would love to see finished products if anyone makes this!
~eliZabeth~

Sugar Cookies!


Last night, I really needed some sugar cookies! Don't ask me why, I just needed them! So I made some! Of course we did not have all of the ingredients for our normal sugar cookies, so I found a different one here. They were definitely equally good and I even made homemade frosting! Here are some pictures:

My lovely frosting in very traditional purple, pink, green, and teal :P

I have decided taht next time I make sugar cookies, they are just going to be a bunch of circles, becausee circles are a lot easier to frost at 10:30 at night! Grandma, I now know what you go through frosting all of those little stars and angels for us to put sprinkles on :P 

My finished products! Well, some of them... notice I only frosted one Christmas tree green :) I'm not a huge fan of traditional red and green ;)
Enjoy!
eliZabeth
Hey all, some people have been asking for another post, so I thought I would publish a quick one today! So here are a few random top ten's:

Top 10 Songs:
10. Shadows- David Crowder and Lecrae(Passion Here For You Deluxe Edition)
9. Seek You- Adie (Just You and Me)
8. Motion of Mercy- Francesca Battistelli (Hundred More Years)
7. Fly Away- JJ Heller (The Pretty and The Plain)
6. Always- Kristian Stanfil(Mountains Move)
5. Hands High- Lecrae(Hands High Single)
4. You Never Change- Lindsay McCaul(If It Leads Me Back EP)
3. Absolutely- Starfeild(The Saving One)
2. Born for This- Mandisa(Music Inspired by the Story)
1. 1945- Jamie Grace(One Song At a Time)

I highly recommend all of these songs, and the rest of the songs on each album!

Top 10 Books/Book Series:
10: The Elizabeth Gail Series(Hilda Stahl)
9: The Box Car Children Books(for younger readers ;))(Gertrude Chandler Warner)
8. Dana's Valley(Janette Oke)
7. I am not but I know I AM(Louie Giglio)
6. The Love Comes Softly Series(Janette Oke)
5. A Life of Faith: Elsie Dinsmore(Martha Finely)
4. A Life of Faith: Millie Kieth(Based on the Elsie books by Martha Finely)
3. Uncompromising( Hannah Farver)(Girls Only!)
2. Friends For A Season Series (Sandra Byrd)
1. The Bible(Jesus) (Of Course it is number 1!)

Enjoy!

eliZabeth

Hair Flowery Thingey

Hi all,
Today, I made a flowerish thing for my hair, specifically, because it goes with the outfit that I am wearing tonight. I found the tutorial for this flower on another sewing blog, it was originally a bracelet, so I changed a few things to make it my own. Here is a picture... I may add a tutorial later, if I make another one, and can photograph the steps for it :) Enjoy! eliZabeth